[toc]
简介
虚拟化技术分为两类,服务器虚拟化和容器技术
服务器虚拟化也就是常见的虚拟机,从操作系统层面入手,在物理机上创建出多个虚拟服务器,相互间隔离cpu、内存、设备与I/O
而容器技术从应用程序层面入手,打包程序需要的可执行文件、函式库、配置文件,在隔离环境中启动进程
两者优缺点对比
| 虚拟机 | 容器 | |
|---|---|---|
| 隔离性 | 完全隔离 | 部分隔离,与操作系统共享内核 |
| 资源占用 | 多,需要引导一个完整的操作系统 | 少,只有进程需要的资源 |
| 部署速度 | 慢,分钟级 | 秒级启动 |
| 性能 | GuestOS的存在,必然有一些损耗 | 接近裸机 |
容器技术实现不止有docker,还有OpenVZ、LXC、Rocket、Lmctfy等
大都是基于Linux内核提供的两个机制:Cgroups(实现资源按需分配)和Namespace(实现任务隔离)
说到隔离,先会想到chroot,切换根目录到指定目录,所有操作都限制在此目录中,chroot只完成了文件系统隔离,
在此基础上,再从另外几个层面进行隔离,就完成了一个简单的容器
Linux Namespace
namespace六项隔离
| namespace | 系统调用参数 | 隔离内容 |
|---|---|---|
| UTS | CLONE_NEWUTS | 主机名与域名 |
| IPC | CLONE_NEWIPC | 信号量、消息队列和共享内存 |
| PID | CLONE_NEWPID | 进程编号 |
| NETWORK | CLONE_NEWNET | 网络设备、网络栈、端口等 |
| MOUNT | CLONE_NEWNS | 挂载点(文件系统) |
| USER | CLONE_NEWUSER | 用户和用户组 |
在同一个namespace下的进程可以感知彼此的变化,而对外界的进程一无所知。这样就可以让容器中的进程产生错觉,仿佛自己置身于一个独立的系统环境中,以此达到独立和隔离的目的。
namespace与进程
每一个进程都会关联namespace,默认情况下所有进程和PID为1的进程共享同一组namespace,来看一看
[root@localhost ~]# /proc/$$/ns
lrwxrwxrwx 1 root root 0 12月 28 09:54 ipc -> ipc:[4026531839]
lrwxrwxrwx 1 root root 0 12月 28 09:54 mnt -> mnt:[4026531840]
lrwxrwxrwx 1 root root 0 12月 28 09:54 net -> net:[4026531956]
lrwxrwxrwx 1 root root 0 12月 28 09:54 pid -> pid:[4026531836]
lrwxrwxrwx 1 root root 0 12月 28 09:54 user -> user:[4026531837]
lrwxrwxrwx 1 root root 0 12月 28 09:54 uts -> uts:[4026531838]
/proc/$PID/ns/下每个文件对应一个namespace, 它是一个符号链接, 会指向一个仅kernel可见的被称为nsfs的文件系统中的一个inode
namespace系统调用
setns
通过setns()来加入已有的namespace,举例来看看效果
比如当前有一个PID为2740的进程,已经完成了六项隔离,打开一个python命令行,和它共享UTS namespace,演示脚本如下
import ctypes
import subprocess

libc = ctypes.CDLL(None)

utsns = file('/proc/2740/ns/uts', 'ro')
libc.setns(utsns.fileno(), 0)

subprocess.call("hostname", shell=True)
subprocess.call('ls -l /proc/{0}/ns'.format(libc.getpid()), shell=True)
'''
输出结果

'''hostname输出的不再是当前主机名了
查到python进程的pid为20170,对比一下各进程的namespace
| 调用参数 | 1 | 2740 | 20170 |
|---|---|---|---|
| ipc | ipc:[4026531839] | ipc:[4026532275] | ipc:[4026531839] |
| mnt | mnt:[4026531840] | mnt:[4026532344] | mnt:[4026531840] |
| net | net:[4026531956] | net:[4026532278] | net:[4026531956] |
| pid | pid:[4026531836] | pid:[4026532346] | pid:[4026531836] |
| user | user:[4026531837] | user:[4026531837] | user:[4026531837] |
| uts | uts:[4026531838] | uts:[4026532345] | uts:[4026532345] |
可以看到,sleep的进程号20170使用的UTS namespace已经发生了改变,其它5项继承了主进程的namespace
unshare
unshare()的主要作用就是不启动一个新进程就可以起到隔离的效果,相当于跳出原先的namespace进行操作。这样,你就可以在原进程进行一些需要隔离的操作
import ctypes
import subprocess

libc = ctypes.CDLL(None)

CLONE_NEWUTS = 0x04000000
CLONE_NEWNET = 0x40000000

libc.unshare(CLONE_NEWUTS)
libc.unshare(CLONE_NEWNET)

libc.sethostname('hostA')

subprocess.call('hostname', shell=True)
'''
hostA
'''
subprocess.call('ip link', shell=True)
'''
1: lo: <LOOPBACK> mtu 65536 qdisc noop state DOWN mode DEFAULT qlen 1
    link/loopback 00:00:00:00:00:00 brd 00:00:00:00:00:00
'''
subprocess.call('ls -l /proc/{0}/ns'.format(libc.getpid()), shell=True)
'''
lrwxrwxrwx 1 root root 0 12月 29 14:34 ipc -> ipc:[4026531839]
lrwxrwxrwx 1 root root 0 12月 29 14:34 mnt -> mnt:[4026531840]
lrwxrwxrwx 1 root root 0 12月 29 14:34 net -> net:[4026532354]
lrwxrwxrwx 1 root root 0 12月 29 14:34 pid -> pid:[4026531836]
lrwxrwxrwx 1 root root 0 12月 29 14:34 user -> user:[4026531837]
lrwxrwxrwx 1 root root 0 12月 29 14:34 uts -> uts:[4026532417]
'''
执行unshare系统调用,隔离出新的uts、network namespace
clone
通过clone()来创建拥有独立namespace的进程
通过flags控制功能,接下来详细介绍
UTS
先从隔离主机名开始,下面是一个c语言例子
#define _GNU_SOURCE
#include <sched.h>
#include <stdio.h>
#include <stdlib.h>
#include <sys/wait.h>
#include <unistd.h>
static char child_stack[1048576];

static int child_fn() {
    sethostname("container",10);
    execv("/bin/bash", NULL);
    return 0;
}

int main() {
    pid_t child_pid = clone(child_fn, child_stack+1048576,
        SIGCHLD
        |CLONE_NEWUTS
        , NULL);
    waitpid(child_pid, NULL, 0);
    return 0;
}
指定系统调用clone()的flag里有CLONE_NEWUTS, 执行函数child_fn会更改主机名,看看执行效果
[root@centos73 ~]# gcc ns_uts.c -o ns_uts && ./ns_uts
[root@container ~]# hostname
container
IPC
容器中进程间通信采用的方法包括常见的信号量、消息队列和共享内存。然而与虚拟机不同的是,容器内部进程间通信对宿主机来说,实际上是具有相同PID namespace中的进程间通信,因此需要一个唯一的标识符来进行区别。申请IPC资源就申请了这样一个全局唯一的32位ID,所以IPC namespace中实际上包含了系统IPC标识符以及实现POSIX消息队列的文件系统。在同一个IPC namespace下的进程彼此可见,而与其他的IPC namespace下的进程则互相不可见
目前使用IPC namespace机制的系统不多,其中比较有名的有PostgreSQL。Docker本身通过socket或tcp进行通信。
PID
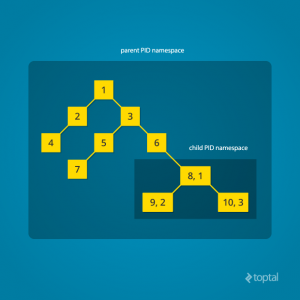
PID namespace隔离非常实用,它对进程PID重新标号,即两个不同namespace下的进程可以有同一个PID。
- 每个PID namespace中的第一个进程
PID 1,都会像传统Linux中的init进程一样拥有特权,起特殊作用 - 在root namespace中可以看到所有的进程,并且递归包含所有子节点中的进程
代码里加入CLONE_NEWPID
#define _GNU_SOURCE
#include <sched.h>
#include <stdio.h>
#include <stdlib.h>
#include <sys/wait.h>
#include <unistd.h>
static char child_stack[1048576];

static int child_fn() {
    printf("PID: %ld\n", (long)getpid());
    sethostname("container",10);
    execv("/bin/bash", NULL);
    return 0;
}

int main() {
    pid_t child_pid = clone(child_fn, child_stack+1048576,
        SIGCHLD
        |CLONE_NEWUTS
        |CLONE_NEWIPC
        |CLONE_NEWPID
        , NULL);
    printf("clone() = %ld\n", (long)child_pid);
    waitpid(child_pid, NULL, 0);
    return 0;
}
执行看看效果
[root@container ~]# gcc ns_pid.c -o ns_pid && ./ns_pid
clone() = 18078
PID: 1
[root@container ~]# echo $$
1结果就是,/bin/bash进程的pid现在是1了
但是,用ps命令查看并没有发生变化,还是显示所有进程 因为与PID直接相关的/proc文件系统(procfs)没有挂载到与原/proc不同的位置。所以如果你只想看到PID namespace本身应该看到的进程,需要重新挂载/proc,命令如下
[root@container ~]# mount -t proc proc /proc
[root@container ~]# ps -ef
UID        PID  PPID  C STIME TTY          TIME CMD
root         1     0  0 09:16 pts/1    00:00:00 [bash]
root        18     1  0 09:20 pts/1    00:00:00 ps -ef
但是这时候宿主机的/proc目录也被重新挂载了,先在宿主机执行挂载命令来还原
[root@centos73 ~]# ps -ef
Error, do this: mount -t proc proc /proc

[root@centos73 ~]# mount -t proc proc /proc
这时候考虑把文件系统也做隔离,先试试传统的chroot,我们拷贝一个完整的linux根文件系统目录,命名为rootfs,内容如下
[root@centos73 ~]# ls rootfs
bin  etc   lib    media  proc  run     sbin  sys  usr
dev home lib64 mnt root run.sh srv tmp var在测试代码里加入chroot,再挂载/proc目录看看
#define _GNU_SOURCE
#include <sched.h>
#include <stdio.h>
#include <stdlib.h>
#include <sys/wait.h>
#include <unistd.h>

static char child_stack[1048576];
char* const container_args[] = {
    "/bin/bash",
    "-l",
    NULL
};
static int child_fn() {
    printf("PID: %ld\n", (long)getpid());
    sethostname("container",10);
    chroot("rootfs");
    mount("proc", "/proc", "proc", 0, NULL);
    chdir("/root");
    execv(container_args[0], container_args);
    return 0;
}
int main() {
    pid_t child_pid = clone(child_fn, child_stack+1048576,
        SIGCHLD
        |CLONE_NEWUTS
        |CLONE_NEWIPC
        |CLONE_NEWPID
        , NULL);
    printf("clone() = %ld\n", (long)child_pid);
    waitpid(child_pid, NULL, 0);
    return 0;
}这时候容器内和宿主机上/proc目录不会再互相干扰了
要注意的是,此时执行的ps等命令,都是rootfs目录下的,可以是任何linux发行版,centos、ubuntu、debian、alpine都可以
还有其它一些挂载项
[root@centos73 ~]# echo hello > /dev/stdout
hello

container:~# echo hello > /dev/stdout
container:~# ls -l /dev/
total 8
-rw-rw-rw-    1 root     root            48 May 25  2017 null
drwxr-xr-x    2 root     root             6 May 25  2017 pts
drwxr-xr-x    2 root     root             6 May 25  2017 shm
-rw-r--r--    1 root     root             0 Dec 27 16:58 stderr
-rw-r--r--    1 root     root             6 Jan  2 10:44 stdout
如上, /dev目录下都是普通文本文件,在容器内还需要重载/dev、/tmp、 /sys等目录
MOUNT
Mount namespace通过隔离文件系统挂载点对隔离文件系统提供支持,它是历史上第一个Linux namespace,所以它的标识位比较特殊,就是CLONE_NEWNS
刚才已经实现了/proc等目录的挂载,我们通过chroot到一个文件系统,将这些目录进行挂载
但是,当容器退出后,该rootfs里发生的变化依旧存在,我们会需要隔离这些变化,CLONE_NEWNS将帮助我们
实现思路,rootfs做只读挂载,/proc等目录做私有挂载,文件变化写入私有目录,这些内容在说到docker文件系统存储时讲述
NETWORK
以往我们想在单个机器上启动同一类服务的多个实例,就必须要使用不同端口才行,这时候就需要network namespace隔离了
加入CLONE_NEWNET, 完整代码如下
#define _GNU_SOURCE
#include <sched.h>
#include <stdio.h>
#include <stdlib.h>
#include <sys/wait.h>
#include <unistd.h>

static char child_stack[1048576];

char* const container_args[] = {
    "/bin/bash",
    "-l",
    NULL
};

static int remount() {
    mount("proc", "/proc", "proc", 0, NULL);
    mount("sysfs", "rootfs/sys", "sysfs", 0, NULL);
    mount("none", "rootfs/tmp", "tmpfs", 0, NULL);
    mount("udev", "rootfs/dev", "devtmpfs", 0, NULL);
    mount("devpts", "rootfs/dev/pts", "devpts", 0, NULL);
    return 0;
}

static int child_fn() {
    printf("PID: %ld\n", (long)getpid());
    sethostname("container",10);
    chroot("rootfs");
    remount();
    chdir("/root");
    execv(container_args[0], container_args);
    return 0;
}

int main() {
    pid_t child_pid = clone(child_fn, child_stack+1048576,
        SIGCHLD
        |CLONE_NEWUTS
        |CLONE_NEWIPC
        |CLONE_NEWPID
        |CLONE_NEWNS
        |CLONE_NEWNET
        , NULL);
    printf("clone() = %ld\n", (long)child_pid);
    waitpid(child_pid, NULL, 0);
    return 0;
}
启动后检查网络设备,会发现只有一个lo设备,我们启动容器内的nginx进程
container:~# ip link
1: lo: <LOOPBACK> mtu 65536 qdisc noop state DOWN qlen 1
    link/loopback 00:00:00:00:00:00 brd 00:00:00:00:00:00
container:~# /usr/local/tengine/sbin/nginx
container:~# netstat -tunlp
Active Internet connections (only servers)
Proto Recv-Q Send-Q Local Address           Foreign Address         State       PID/Program name
tcp        0      0 0.0.0.0:10110           0.0.0.0:*               LISTEN      4/nginx
可以看到,容器内的nginx监听了10110端口,而在宿主机上查看,是不会发现有此端口的
接下来,重复创建容器、启动nginx,相互间都不会有影响的
外部如何访问?
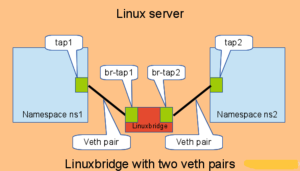
只有一个lo是无法提供对外服务的,需要在容器内建立新的网络设备
下面通过一个例子来演示,如何通过linux bridge和veth pair设备来打通宿主机和容器间的网络
# 启动一个网络隔离的容器
[root@centos73 ~]# ./ns_network
clone() = 16877
PID: 1
container:~# /usr/local/tengine/sbin/nginx

# 得到容器PID为16877,接下来的操作都在宿主机执行
# ip netns子命令用来操作network namespace
# 1. 把进程16877的net ns连接到ip netns子命令默认执行目录
[root@centos73 ~]# mkdir /var/run/netns
[root@centos73 ~]# ln -s /proc/16877/ns/net /var/run/netns/ns16877
[root@centos73 ~]# ip netns
ns16877

# 创建veth pair
[root@centos73 ~]# ip link add veth16877.in type veth peer name veth16877.out

# 将其中一块veth设备放入容器所在的netns,即ns16877
[root@centos73 ~]# ip link set dev veth16877.in netns ns16877

# 设置网卡名,添加ip 10.2.0.10
[root@centos73 ~]# ip netns exec ns16877 ip link set dev veth16877.in name eth0
[root@centos73 ~]# ip netns exec ns16877 ip addr add 10.2.0.10/24 dev eth0
[root@centos73 ~]# ip netns exec ns16877 ip link set eth0 up
[root@centos73 ~]# ip netns exec ns16877 ip link set lo up

# 查看网络设备和路由等
[root@centos73 ~]# ip netns exec ns16877 ip link
1: lo: <LOOPBACK,UP,LOWER_UP> mtu 65536 qdisc noqueue state UNKNOWN mode DEFAULT qlen 1
    link/loopback 00:00:00:00:00:00 brd 00:00:00:00:00:00
14: eth0@if15: <NO-CARRIER,BROADCAST,MULTICAST,UP> mtu 1500 qdisc noqueue state LOWERLAYERDOWN mode DEFAULT qlen 1000
    link/ether ce:13:22:8c:22:c7 brd ff:ff:ff:ff:ff:ff link-netnsid 0
[root@centos73 ~]# ip netns exec ns16877 route -n
Kernel IP routing table
Destination     Gateway         Genmask         Flags Metric Ref    Use Iface
10.2.0.0        0.0.0.0         255.255.255.0   U     0      0        0 eth0

# 创建linux bridge,关闭stp
[root@centos73 ~]# brctl addbr nsbr
[root@centos73 ~]# brctl stp nsbr off

# 设定bridge的ip为10.2.0.1
[root@centos73 ~]# ip addr add 10.2.0.1/24 dev nsbr
[root@centos73 ~]# ip link set nsbr up

# 将另外一个veth设备放入bridge
[root@centos73 ~]# ip link set veth16877.out up
[root@centos73 ~]# brctl addif nsbr veth16877.out

# 测试网络
[root@centos73 ~]# ping -c 1 10.2.0.10
PING 10.2.0.10 (10.2.0.10) 56(84) bytes of data.
64 bytes from 10.2.0.10: icmp_seq=1 ttl=64 time=0.077 ms
....

# 测试应用
[root@centos73 ~]# curl -I 10.2.0.10:10110
HTTP/1.1 200 OK
Server: Tengine/2.2.0
....
还有很多其它方案,比如把宿主机上多余的网卡转移到此namespace中,有些物理网卡支持虚拟函数,可以生成虚拟网卡放入namespace,当然还有一些overlay的方案
User
User namespace主要隔离了安全相关的标识符(identifiers)和属性(attributes),包括用户ID、用户组ID、root目录、key(指密钥)以及特殊权限。说得通俗一点,一个普通用户的进程通过clone()创建的新进程在新user namespace中可以拥有不同的用户和用户组。这意味着一个进程在容器外属于一个没有特权的普通用户,但是他创建的容器进程却属于拥有所有权限的超级用户,这个技术为容器提供了极大的自由。